The KTM-150 is a medium-to-low torque model in the KILEWS (Taiwan, China) KTM series, with a range of 1.5–150.0 kgf·cm (0.15–15.0 N·m) and ±0.5% accuracy. It is mainly used to verify the output torque of electric screwdrivers, for daily production-line checks and torque setting management. Its operation is not complicated, but in the chain "set upper/lower limits → zero → fit the test joint → run once until the clutch trips → read the GOOD/NG lamp", a mistake at any step distorts the reading. This article follows the actual operating sequence and explains each step against KILEWS' official KTM-150 operation video; specifications follow the official KILEWS specification table and our product page.
I. First, be clear about what this instrument measures and what it does not
- It measures screwdriver output torque: the peak torque at the moment the clutch trips when an electric screwdriver tightens, used for torque setting verification, daily checks and quality records.
- Applicable tool types are limited: the English Features section of the KILEWS website states explicitly "Products are suitable for shut off type screwdriver only" — that is, for shut-off / clutch-type electric screwdrivers (which trip automatically at the set torque). Our product page further states not suitable for testing pneumatic screwdrivers; for non-shut-off or impact tools, confirm applicability before mounting rather than putting them straight on the tester.
- Never exceed the range: both the red CAUTION label on the body and our product page warn against use beyond the maximum measuring range. Running torque close to full scale for long periods damages the sensor and makes readings meaningless.
- It is not a residual torque tester: to measure the residual torque left in a joint after tightening, use an appropriate torque wrench or residual torque test method, not a "reverse drive" on the test joint.
II. Getting to know the panel: keys, indicators and test joints
As the operation video shows, the front of the yellow body carries, from top to bottom, the LCD display, GOOD / NG indicator lamps and the keypad; on top is the measuring seat for mounting the spring test joint (run-down joint). The key layout is as follows:
- LCD: shows live value, peak hold value or setting; after power-on and zeroing it displays 0.00.
- GOOD (green) / NG (red) LEDs: this is the official "torque range identification LED" function — GOOD lights when the result falls within the user-set range, NG warns when it is outside. After setup is complete, the green GOOD lamp is clearly visible in the video.
- UNIT: unit switching between kgf·cm, N·m and Lbf·in.
- PRG/SET: enters upper/lower limit setting; used together with UP / DOWN to increase or decrease values. In the video the LCD moves between 0.00, 0.10, 2.00 and similar values — that is the setting and reading process.
- MODE: switches measurement mode. Our product page records TRACK (live tracking) / PEAK (peak hold); for daily checks, PEAK is recommended to capture the peak at the moment of clutch trip.
- AVE: displays maximum / minimum / average for a group of tests; automatic calculation of these three statistics is one of the official features.
- MEM/OUTPUT: memory and data output; the USB 1.0 connector on the side of the body can link to a PC for reading and managing test data.
- CLEAR (large black key): clears the current reading / zeroes;RESET: reset. With auto-zero enabled you no longer need to press zero manually each time.
Supplied as standard: 3 spring test joints: AJ-150 / AJ-50 / AJ-15K, plus a dedicated charger, manual and carrying case. Different joints suit different torque bands and bit sizes; choose according to the torque range of the screwdriver under test and fit it onto the top measuring seat.
III. Four preparations before power-on
- Charging: the dedicated charger takes AC100–240V 50/60Hz input and outputs DC12V 400mA; the Ni-MH batteries (1.2V × 4 cells, 1650 mAh) charge in about 3 hours, give about 12 hours of continuous use, and can be recharged over 300 times.Do not measure while charging, as this affects accuracy (see "Precautions" on our product page).
- Select and fit the test joint: choose the appropriate AJ-150 / AJ-50 / AJ-15K for the expected torque, seat it firmly with no looseness.
- Power-on and zeroing: after power-on confirm the LCD shows 0.00; if a residual reading remains, press CLEAR.
- Confirm unit and mode: use UNIT to select the recording unit first, then MODE to select PEAK or TRACK, to avoid discovering after the test that the unit is wrong and the data cannot be compared with the process document.
IV. Setting torque limits (first half of the video)
- Press PRG/SET to enter setting mode; the LCD shows the current setting.
- Use UP / DOWN to adjust the value and set the lower and upper limits required by the process. The settings should match the process torque tolerance band, not simply push the upper limit to full scale — that would make the GOOD/NG lamps useless as a filter.
- Press PRG/SET to confirm and exit setting. From then on every test peak is compared with these limits and the GOOD / NG lamps give a direct pass/fail judgement, with no need to compare numbers manually one by one.
- When recording several groups of data, fix the unit and limits first and do not change the settings midway, otherwise earlier and later data are not comparable.
KILEWS describes the function as "a torque range identification LED can be set; users can define the range to be tested, and the torque meter shows a warning lamp if the result does not meet requirements" — the instrument performs the judgement, the operator only sets and reads.
V. Getting one valid reading: the formal test procedure
- Alignment: insert the screwdriver bit vertically into the cushion coupling of the spring test joint, keeping it coaxial with the measuring axis and applying no side load; side loading is the most common source of error in torque testing.
- Run until trip: press the screwdriver trigger and let the clutch trip naturally (stop when you hear / feel the "click").Do not keep forcing after the trip; the extra force directly raises the reading.
- Reading: in PEAK mode the LCD holds the peak — record that value; TRACK mode shows the live value and is useful for watching torque rise.
- Judgement: watch the GOOD / NG lamps. Within the set range the green GOOD lamp lights; outside it the red NG lamp warns.
- Zero and repeat: press CLEAR to zero before the next test. We recommend 5–10 consecutive tests, then use AVE for the average together with maximum / minimum to judge screwdriver repeatability and clutch stability — one good reading does not mean a stable batch.
The video repeatedly shows power-on zeroing, PRG/SET and UP/DOWN setting, and the GOOD lamp lighting — exactly the "set → zero → test → judge" cycle above.
VI. Full operation video (playable directly)
Below is KILEWS' official KTM-150 product operation video, 4 min 11 s long, demonstrating power-on zeroing, UNIT / PRG/SET / UP / DOWN setting, the auto-zero switch and GOOD / NG judgement. Originally portrait, it has been converted to H.264/AAC web format with a seekable progress bar.
Video 1 KILEWS KTM-150 Torque Tester — official operation demonstration (open in new window / download)
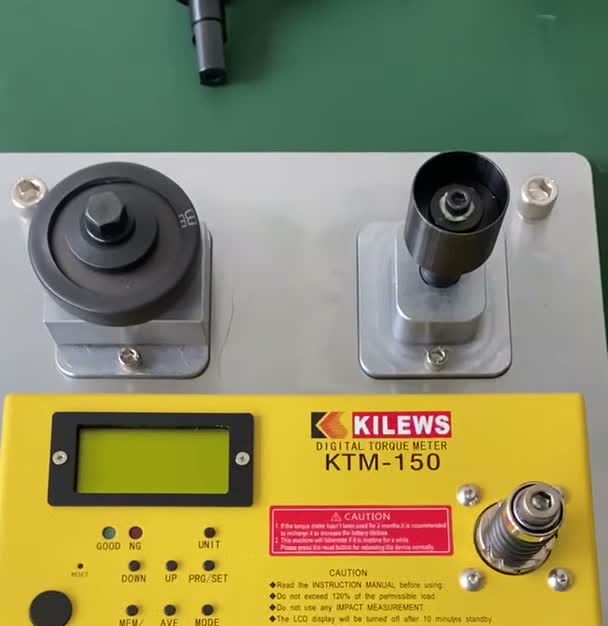
Figure 1 KTM-150 main unit (LCD, GOOD / NG lamps, keypad) and the spring test joint on top
VII. Statistics, memory and USB data output
- Automatic statistics: official features state that maximum, minimum and average for a group of tests are calculated automatically and recalled with AVE, useful for judging screwdriver repeatability.
- Memory and output: MEM/OUTPUT handles storage and output of test data; the body has a USB 1.0 connector for PC connection and data management (listed on the official site as data output).
- Auto zero: an auto-zero switch can be enabled with an adjustable zeroing time of 0.5–3.0 s (our product page); with it on, the operator does not need to keep pressing zero, which noticeably improves efficiency in continuous line checks. In manual mode, press CLEAR before each test.
- Data traceability: for quality traceability, record the unit, limits, measurement mode and statistics for each round together, rather than leaving a pile of bare numbers with no way to reproduce the test conditions.
VIII. Common mistakes and precautions
- Testing pneumatic or non-shut-off tools: the official limitation is shut off type screwdriver, and our product page states "not suitable for testing pneumatic screwdrivers"; with the wrong tool type the numbers are meaningless.
- Exceeding the maximum measuring range: both the CAUTION label and the product page warn of this; over-range damages the sensor.
- Measuring while charging: the precautions on our product page explicitly note that accuracy is affected.
- Forcing after trip, or applying force with a tilted bit: the former raises the reading, the latter introduces side load; both degrade repeatability.
- Forgetting to zero or to switch units: residual values added to readings, and units inconsistent with the process document, are the two most common "false anomalies" on a production line.
- Drawing a conclusion from a single test: use a group of 5–10 tests and look at average plus maximum / minimum.
- Skipping long-term calibration: the supplied inspection certificate only reflects factory condition; where metrological traceability is required, calibrate on a cycle and retain the certificate.
- Battery care: Ni-MH cells age faster if stored discharged; switch off for long periods of non-use and top up periodically — the unit itself advises powering off when not in use.
IX. Choosing within the KTM series: range comparison
The KTM series is graded by range; keep your usual torque in the middle of the range (about 20%–80%). The table below gives the test ranges from the official KILEWS specification table.
| Model | kgf·cm | N·m | Typical application |
|---|---|---|---|
| KTM-6 | 0.02~8.0 | 0.2~80.0 cN·m | Micro torque, precision electronics assembly |
| KTM-15 | 0.15~15.0 | 0.015~1.500 | Low-torque electric screwdrivers |
| KTM-50S | 0.5~50.0 | 0.05~4.90 | General medium-to-low torque |
| KTM-150 | 1.5~150.0 | 0.15~15.0 | Medium-to-low torque electric screwdrivers (the model in this article) |
| KTM-250 | 50~250.0 | 5~25.00 | Medium-to-high torque screwdrivers |
| KTM-1000 | 50~1000 | 5–100 (accuracy graded) | High torque, lithium-battery tools |
Among them the KTM-150 covers 0.15–15.0 N·m, the most common medium-to-low torque band on production lines. If your usual torque is below 0.15 N·m, look at the KTM-15 or KTM-50S; if it is regularly above 15 N·m, move up to the KTM-250 / KTM-1000.
X. KTM-150 quick specification reference
| Test range | 1.5~150.0 kgf·cm / 0.15~15.0 N·m / 1.5~130.0 Lbf·in |
| Accuracy | ±0.5% |
| Units / modes | Switchable kgf·cm, N·m, Lbf·in; TRACK / PEAK |
| Power | 4.8 V DC, Ni-MH rechargeable batteries 1.2 V × 4 cells 1650 mAh; about 3 h charging, about 12 h runtime, over 300 charge cycles |
| Charger | Input AC100–240V 50/60Hz, output DC12V 400mA |
| Dimensions / weight | 230 (W) × 125 (D) × 65 (H) mm, approx. 1.8 kg |
| Standard accessories | Spring test joints AJ-150 / AJ-50 / AJ-15K, one each; dedicated charger; manual; carrying case |
| Functions | Upper/lower limit LED judgement, auto zero, maximum / minimum / average statistics, USB 1.0 data output |
XI. Sources
- KILEWS Industrial Co., Ltd. official website: KTM-150 Torque Tester (Traditional Chinese specification table and product features)、KTM-150 Torque Meter (English Features, applicable tool restrictions)
- KILEWS official "KTM-150 Product Operation Video" (embedded in Section VI of this article)
- Product page on this site: KILEWS KTM-150 Digital Torque Tester(measurement modes, zeroing time, standard accessories and precautions)
- For more models see Torque Tester Catalogue; related reading: Torque Tester Operating Precautions and Calibration Intervals